SpringBoot
概述

Yaml配置文件
要不为application.yml要不就是application.properties.
#yml对空格十分严格,可以注入到我们的配置类中
server:
  port: 8080
#key:(空格)value
name: dydong
#对象
student:
  name: dydong
  age: 3
#数组
pets:
  - cat
  - dog
  - pig
pets: [cat,dog,pig]
属性赋值
在pojo中创建Person类:
package com.dyd.helloworld.pojo;

import org.springframework.boot.context.properties.ConfigurationProperties;
import org.springframework.stereotype.Component;

import java.util.Date;
import java.util.List;
import java.util.Map;

@Component
@ConfigurationProperties(prefix = "person")
public class Person {
    private String name;
    private Integer age;
    private Boolean happy;
    private Date birth;
    private Map<String,Object> maps;
    private List<Object> lists;
    private Dog dog;

    public Person(){

    }
    public Person(String name, Integer age, Boolean happy, Date birth, Map<String, Object> maps, List<Object> lists, Dog dog) {
        this.name = name;
        this.age = age;
        this.happy = happy;
        this.birth = birth;
        this.maps = maps;
        this.lists = lists;
        this.dog = dog;
    }

    public String getName() {
        return name;
    }

    public Integer getAge() {
        return age;
    }

    public Boolean getHappy() {
        return happy;
    }

    public Date getBirth() {
        return birth;
    }

    public Map<String, Object> getMaps() {
        return maps;
    }

    public List<Object> getLists() {
        return lists;
    }

    public Dog getDog() {
        return dog;
    }

    public void setName(String name) {
        this.name = name;
    }

    public void setAge(Integer age) {
        this.age = age;
    }

    public void setHappy(Boolean happy) {
        this.happy = happy;
    }

    public void setBirth(Date birth) {
        this.birth = birth;
    }

    public void setMaps(Map<String, Object> maps) {
        this.maps = maps;
    }

    public void setLists(List<Object> lists) {
        this.lists = lists;
    }

    public void setDog(Dog dog) {
        this.dog = dog;
    }

    @Override
    public String toString() {
        return "Person{" +
                "name='" + name + '\'' +
                ", age=" + age +
                ", happy=" + happy +
                ", birth=" + birth +
                ", maps=" + maps +
                ", lists=" + lists +
                ", dog=" + dog +
                '}';
    }
}
在application.yml中进行配置编写:
person:
    name: qinjiang${random.uuid} # 随机uuid
    age: ${random.int}  # 随机int
    happy: false
    birth: 2000/01/01
    maps: {k1: v1,k2: v2}
    lists:
      - code
      - girl
      - music
    dog:
      name: ${person.hello:other}_旺财
      age: 1
然后用注解注入:
@Component
@ConfigurationProperties(prefix = "person")
JSR303校验
@NotNull(message="名字不能为空")
private String userName;
@Max(value=120,message="年龄最大不能查过120")
private int age;
@Email(message="邮箱格式错误")
private String email;

空检查
@Null       验证对象是否为null
@NotNull    验证对象是否不为null, 无法查检长度为0的字符串
@NotBlank   检查约束字符串是不是Null还有被Trim的长度是否大于0,只对字符串,且会去掉前后空格.
@NotEmpty   检查约束元素是否为NULL或者是EMPTY.

Booelan检查
@AssertTrue     验证 Boolean 对象是否为 true
@AssertFalse    验证 Boolean 对象是否为 false

长度检查
@Size(min=, max=) 验证对象(Array,Collection,Map,String)长度是否在给定的范围之内
@Length(min=, max=) string is between min and max included.

日期检查
@Past       验证 Date 和 Calendar 对象是否在当前时间之前
@Future     验证 Date 和 Calendar 对象是否在当前时间之后
@Pattern    验证 String 对象是否符合正则表达式的规则

.......等等
除此以外,我们还可以自定义一些数据校验规则
多环境下配置
可以在resources文件下创建一个config文件夹,统一管理application.yml文件,以及不同的环境文件(application-test.properties 代表测试环境配置,application-dev.properties 代表开发环境配置),通过application.yml作为主文件统一管理,项目打包好以后,我们可以使用命令行参数的形式,启动项目的时候来指定配置文件的新位置;这种情况,一般是后期运维做的多,相同配置,外部指定的配置文件优先级最高,例如:
application.yml
server:
  port: 8081
#选择要激活那个环境块
spring:
  profiles:
    active: dev

---
server:
  port: 8083
spring:
  profiles: dev #配置环境的名称

---
server:
  port: 8084
spring:
  profiles: test  #配置环境的名称
application-test.properties
person:
  name: dydong1
  age: 13
  happy: false
  birth: 2022/11/11
  maps: {k1: v1,k2: v2}
  lists:
    - code
    - girl
    - music
  dog:
    name: wuhu
    age: 13
application-dev.properties
person:
  name: dydong2
  age: 213
  happy: true
  birth: 1111/11/11
  maps: {k3: v3,k2: v2}
  lists:
    - boy
    - music
  dog:
    name: wuhu~~
    age: 15
Web开发
在之前我们的项目都是以jar包结尾的,没有放webapp的地方。
springboot最大的特点:自动装配
1.创建应用,选择模块导入starter,只需要专注于业务代码
springboot到底帮我们配置了什么,我们能不能修改?能修改哪些东西?能不能扩展
xxxAutoConfiguration:向容器中自动配置组件
xxxProperties:自动配置类,装配配置文件中自定义的一些内容
要解决的问题:
- 导入静态资源html,css,js
- 首页
- 写jsp的地方,模板引擎Thymeleaf
- 装配和扩展SpringMVC
- 增删改查
- 拦截器
静态资源导入
静态资源映射规则
@Override
public void addResourceHandlers(ResourceHandlerRegistry registry) {
    if (!this.resourceProperties.isAddMappings()) {
        // 已禁用默认资源处理
        logger.debug("Default resource handling disabled");
        return;
    }
    // 缓存控制
    Duration cachePeriod = this.resourceProperties.getCache().getPeriod();
    CacheControl cacheControl = this.resourceProperties.getCache().getCachecontrol().toHttpCacheControl();
    // webjars 配置
    if (!registry.hasMappingForPattern("/webjars/**")) {
        customizeResourceHandlerRegistration(registry.addResourceHandler("/webjars/**")
                                             .addResourceLocations("classpath:/META-INF/resources/webjars/")
                                             .setCachePeriod(getSeconds(cachePeriod)).setCacheControl(cacheControl));
    }
    // 静态资源配置
    String staticPathPattern = this.mvcProperties.getStaticPathPattern();
    if (!registry.hasMappingForPattern(staticPathPattern)) {
        customizeResourceHandlerRegistration(registry.addResourceHandler(staticPathPattern)
                                             .addResourceLocations(getResourceLocations(this.resourceProperties.getStaticLocations()))
                                             .setCachePeriod(getSeconds(cachePeriod)).setCacheControl(cacheControl));
    }
}
读一下源代码:比如所有的 /webjars/** , 都需要去 classpath:/META-INF/resources/webjars/ 找对应的资源;
自己的静态资源该怎么导入呢?
"classpath:/META-INF/resources/"
"classpath:/resources/"
"classpath:/static/"
"classpath:/public/"
Thymeleaf模板
导入依赖
<dependency>
    <groupId>org.springframework.boot</groupId>
    <artifactId>spring-boot-starter-thymeleaf</artifactId>
</dependency>
我们去找一下Thymeleaf的自动配置类:ThymeleafProperties,可以看到在templates下寻找html文件:
public class ThymeleafProperties {
    private static final Charset DEFAULT_ENCODING;
    public static final String DEFAULT_PREFIX = "classpath:/templates/";
    public static final String DEFAULT_SUFFIX = ".html";
    private boolean checkTemplate = true;
    private boolean checkTemplateLocation = true;
    private String prefix = "classpath:/templates/";
    private String suffix = ".html";
    private String mode = "HTML";
    private Charset encoding;
}
首先在html文件中加入
<html lang="en" xmlns:th="http://www.thymeleaf.org">接下来即可使用后该引擎语法
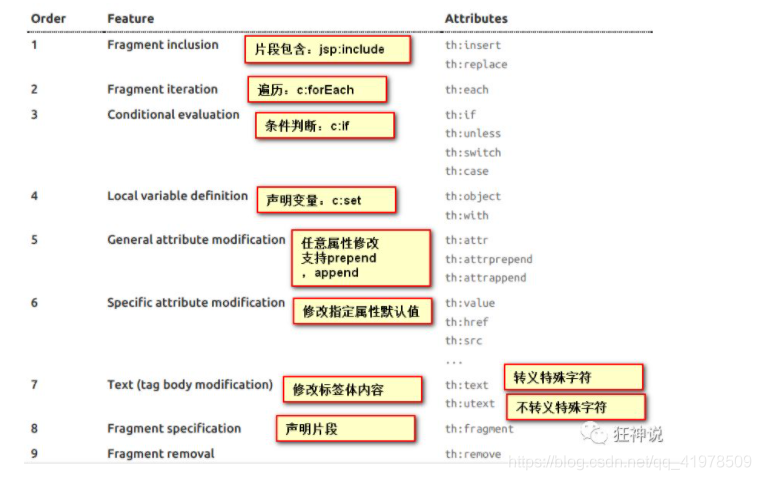
<body>
<h1>测试页面</h1>

<!--th:text就是将div中的内容设置为它指定的值,和之前学习的Vue一样-->
<!--转义与不转义-->
<div th:text="${msg}"></div>
<div th:utext="${msg}"></div>
<hr>
<!--使用foreach进行遍历-->
<h3 th:each="user:${users}" th:text="${user}"></h3>
</body>官网:Thymeleaf
WEB开发技巧
首页实现
导入静态文件后,在config中配置首页设置:
@Configuration
public class MyMvcConfig implements WebMvcConfigurer {
    @Override
    public void addViewControllers(ViewControllerRegistry registry) {
        //通过index.html或者/来访问
        registry.addViewController("/").setViewName("index");
        registry.addViewController("/index.html").setViewName("index");
    }
}
对于html文件我们也要用Thymeleaf模板引擎去实现:
- 首先导入Thymeleaf的配置
- 对于css文件的索引我们用
th:href="@{/css/bootstrap.min.css}"
国际化
在resources文件中创建i18n文件夹然后配置login.properties包,可以利用插件对文字进行中英对照。
在配置文件中写入
#我们的配置文件真实位置
spring.messages.basename=i18n.login
3.重写LocaleResolver方法:
//解析请求
@Override
public Locale resolveLocale(HttpServletRequest request) {
    String language = request.getParameter("l");
    Locale locale = Locale.getDefault();    //默认
    //如果请求链接携带参数
    if(!StringUtils.isEmpty(language))
    {
        String[] split = language.split("_");
        //国家地区
        locale = new Locale(split[0],split[1]);
    }
    return locale;
}4.设置href请求th:href="@{/index.html(l='zh_CN')}" th:href="@{/index.html(l='en_US')}",并且设置转换的字<h1 class="h3 mb-3 font-weight-normal" th:text="#{login.tip}">Please sign in</h1>。
5.添加bean组件:
//自定义的国际化组件
@Bean
public LocaleResolver localeResolver(){
    return new MyLocaleResolver();
}
登录
1.首先添加一个controller层,此处返回要去config文件中加一个试图解析registry.addViewController("/main.html").setViewName("dashboard");。
@RequestMapping("/user/login")
public String login(String username, String password, Model model){
    if(!StringUtils.isEmpty(username)&&"123456".equals(password)){
        return "redirect:/main.html";
    }else{
        model.addAttribute("msg","用户名或密码错误!");
        return "index";
    }
}
2.修改index中的登录失败信息:
<p style="color: red" th:text="${msg}" th:if="${not #strings.isEmpty(msg)}"></p>前端代码整合
公共部分我们可以创建一个commons文件夹将头部菜单和边菜单给整合起来,使用th:fragment="topbar"进行取名,在其它html页面我们可以使用<div th:replace="~{commons/commons::sidebar(active='list.html')}"></div>进行提取,利用括号传值显示是否高亮显示,在common处设置th:class="${active=='main.html'?'nav-link active':'nav-link'}"。
404类页面
在templates文件中创建一个error文件夹直接在里面建立404.html或者其它错误页面代码即可。
整合JDBC
首先在application.yml中配置数据库的配置文件:
spring:
  datasource:
    username: root
    password: 123456
    url: jdbc:mysql://localhost:3306/mybatis?serverTimezone=UTC&useUnicode=true&characterEncoding=utf-8&useSSL=false
    driver-class-name: com.mysql.cj.jdbc.Driver
可以利用jdbcTemplate进行语句的重构然后进行执行:
@RestController
public class JDBCController {
    @Resource
    JdbcTemplate jdbcTemplate;
    //查询所有信息
    @GetMapping("/userList")
    public List<Map<String,Object>> userList(){
        String sql="select * from user";
        List<Map<String, Object>> maps = jdbcTemplate.queryForList(sql);
        return maps;
    }
    //添加用户
    @GetMapping("/adduser")
    public String addUser(){
        String sql="insert into mybatis.user(id,name,pwd) values(5,'user5','123')";
        jdbcTemplate.update(sql);
        return "update_success!";
    }
    //添加用户
    @GetMapping("/updateUser/{id}")
    public String updateUser(@PathVariable("id") int id){
        String sql="update mybatis.user set name=?,pwd=? where id="+id;
        Object[] objects=new Object[2];
        objects[0]="user6";
        objects[1]="123456";
        jdbcTemplate.update(sql,objects);
        return "updateUser_success!";
    }
    //添加用户
    @GetMapping("/deleteUser/{id}")
    public String deleteUser(@PathVariable("id") int id){
        String sql = "delete from mybatis.user where id=?";
        jdbcTemplate.update(sql,id);
        return "deleteUser_success!";
    }
}
Druid
在mvn官网Maven Repository: com.alibaba » druid » 1.2.8 (mvnrepository.com)中可以寻找下载的依赖包:
<dependency>
    <groupId>com.alibaba</groupId>
    <artifactId>druid</artifactId>
    <version>1.2.8</version>
</dependency>
然后只要在yaml配置中添加以下语句就可以切换数据源:
type: com.alibaba.druid.pool.DruidDataSource可以设置数据源连接初始化大小、最大连接数、等待时间、最小连接数 等设置项:
#Spring Boot 默认是不注入这些属性值的,需要自己绑定
#druid 数据源专有配置
initialSize: 5
minIdle: 5
maxActive: 20
maxWait: 60000
timeBetweenEvictionRunsMillis: 60000
minEvictableIdleTimeMillis: 300000
validationQuery: SELECT 1 FROM DUAL
testWhileIdle: true
testOnBorrow: false
testOnReturn: false
poolPreparedStatements: true

#配置监控统计拦截的filters,stat:监控统计、log4j:日志记录、wall:防御sql注入
#如果允许时报错  java.lang.ClassNotFoundException: org.apache.log4j.Priority
#则导入 log4j 依赖即可,Maven 地址:https://mvnrepository.com/artifact/log4j/log4j
filters: stat,wall,log4j
maxPoolPreparedStatementPerConnectionSize: 20
useGlobalDataSourceStat: true
connectionProperties: druid.stat.mergeSql=true;druid.stat.slowSqlMillis=500\
如果要使用log4j还需要添加mvn依赖:
<!-- https://mvnrepository.com/artifact/log4j/log4j -->
<dependency>
    <groupId>log4j</groupId>
    <artifactId>log4j</artifactId>
    <version>1.2.17</version>
</dependency>
接下来只要在config中添加bean的配置文件(DruidConfig)就可以开启检测系统:
package com.dyd.springdata.config;

import com.alibaba.druid.pool.DruidDataSource;
import com.alibaba.druid.support.http.StatViewServlet;
import com.alibaba.druid.support.http.WebStatFilter;
import org.springframework.boot.context.properties.ConfigurationProperties;
import org.springframework.boot.web.servlet.FilterRegistrationBean;
import org.springframework.boot.web.servlet.ServletRegistrationBean;
import org.springframework.context.annotation.Bean;
import org.springframework.context.annotation.Configuration;

import javax.sql.DataSource;
import java.util.Arrays;
import java.util.HashMap;
import java.util.Map;

@Configuration
public class DruidConfig {

    @ConfigurationProperties(prefix="spring.datasource")
    @Bean
    public DataSource druidDataSource(){
        return new DruidDataSource();
    }

    @Bean
    public ServletRegistrationBean statViewServlet()
    {
        ServletRegistrationBean bean = new ServletRegistrationBean(new StatViewServlet(), "/druid/*");
        Map<String, String> initParams = new HashMap<>();

        initParams.put("loginUsername", "admin"); //后台管理界面的登录账号
        initParams.put("loginPassword", "123456"); //后台管理界面的登录密码
        //后台允许谁可以访问
        //initParams.put("allow", "localhost"):表示只有本机可以访问
        //initParams.put("allow", ""):为空或者为null时,表示允许所有访问
        initParams.put("allow", "");
        //deny:Druid 后台拒绝谁访问
        //initParams.put("kuangshen", "192.168.1.20");表示禁止此ip访问
        bean.setInitParameters(initParams);
        return bean;
    }

    @Bean
    public FilterRegistrationBean webStatFilter(){
        FilterRegistrationBean bean = new FilterRegistrationBean();
        bean.setFilter(new WebStatFilter());
        Map<String, String> initParams = new HashMap<>();
        initParams.put("exclusions", "*.js,*.css,/druid/*,/jdbc/*");
        bean.setInitParameters(initParams);

        //"/*" 表示过滤所有请求
        bean.setUrlPatterns(Arrays.asList("/*"));
        return bean;
    }
}
Mybatis
1.导入springboot-mybatis依赖:
<dependency>
    <groupId>org.mybatis.spring.boot</groupId>
    <artifactId>mybatis-spring-boot-starter</artifactId>
    <version>2.2.2</version>
</dependency>
2.创建pojo目录创建实体类:
@Data
@AllArgsConstructor
@NoArgsConstructor
public class User {
    private Integer id;
    private String name;
    private String pwd;
}
3.创建mapper目录以及对应的 Mapper 接口:
@Mapper
@Repository
public interface UserMapper {
    List<User> queryUserList();
}
4.在resources文件夹中创建mybatis和mapper目录,建立UserMapper.xml:
<?xml version="1.0" encoding="UTF-8" ?>
<!DOCTYPE mapper
        PUBLIC "-//mybatis.org//DTD Config 3.0//EN"
        "http://mybatis.org/dtd/mybatis-3-mapper.dtd">
<!--configuration core file-->
<mapper namespace="com.dyd.springbootmybaits.mapper.UserMapper">

    <select id="queryUserList" resultType="User">
        select * from user
    </select>

</mapper>
5.在yml中进行配置:
mybatis:
  type-aliases-package: com.dyd.springbootmybaits.pojo
  mapper-locations: classpath:mybatis/mapper/*.xml
6.在controller中测试:
@Autowired
private UserMapper userMapper;
@GetMapping("/queryUserList")
public List<User> queryUserList(){
    List<User> users = userMapper.queryUserList();
    return users;
}
spring-security
Spring Security的两个主要目标是 “认证” 和 “授权”(访问控制)。
“认证”(Authentication)
身份验证是关于验证您的凭据,如用户名/用户ID和密码,以验证您的身份。
身份验证通常通过用户名和密码完成,有时与身份验证因素结合使用。
“授权” (Authorization)
授权发生在系统成功验证您的身份后,最终会授予您访问资源(如信息,文件,数据库,资金,位置,几乎任何内容)的完全权限。这个概念是通用的,而不是只在Spring Security 中存在。
几个重点的类
WebSecurityConfigurerAdapter:自定义Security策略
AuthenticationManagerBuilder:自定义认证策略
@EnableWebSecurity:开启WebSecurity模式
首先导入依赖:
<!--SpringSecurity -->
<dependency>
     <groupId>org.springframework.boot</groupId>
     <artifactId>spring-boot-starter-security</artifactId>
</dependency>
新建一个配置文件,并且继承 WebSecurityConfigurerAdapter,并且要添加@EnableWebSecurity注解:
package com.dydong.config;

import org.springframework.security.config.annotation.authentication.builders.AuthenticationManagerBuilder;
import org.springframework.security.config.annotation.web.builders.HttpSecurity;
import org.springframework.security.config.annotation.web.configuration.EnableWebSecurity;
import org.springframework.security.config.annotation.web.configuration.WebSecurityConfigurerAdapter;
import org.springframework.security.crypto.bcrypt.BCryptPasswordEncoder;
import sun.security.provider.MD5;

@EnableWebSecurity
public class SecurityConfig extends WebSecurityConfigurerAdapter {
    //链式编程,授权
    @Override
    protected void configure(HttpSecurity http) throws Exception {
        //首页所有人可以访问,功能页只有有权限的人才能访问
        //请求授权规则
        http.authorizeRequests()
                .antMatchers("/").permitAll()
                .antMatchers("/level1/**").hasRole("vip1")
                .antMatchers("/level2/**").hasRole("vip2")
                .antMatchers("/level3/**").hasRole("vip3");

        // 开启自动配置的登录功能
        // /login 请求来到登录页
        // /login?error 重定向到这里表示登录失败
        http.formLogin().loginPage("/toLogin");
        //注销
        http.csrf().disable();
        http.logout().logoutSuccessUrl("/");
        //开启记录功能
        http.rememberMe().rememberMeParameter("remember");
    }

    //认证
    //在spring中新增了许多加密方式
    @Override
    protected void configure(AuthenticationManagerBuilder auth) throws Exception {
        auth.inMemoryAuthentication().passwordEncoder(new BCryptPasswordEncoder())
                .withUser("admin").password(new BCryptPasswordEncoder().encode("123456")).roles("vip2","vip3")
                .and()
                .withUser("root").password(new BCryptPasswordEncoder().encode("123456")).roles("vip1","vip2","vip3")
                .and()
                .withUser("guest").password(new BCryptPasswordEncoder().encode("123456")).roles("vip1");
    }
}
这一部分水了,我们采用后面的shiro。
Shiro
1.导入pom.xml依赖:
    <!-- configure logging -->
    <dependency>
        <groupId>org.slf4j</groupId>
        <artifactId>jcl-over-slf4j</artifactId>
        <version>1.7.21</version>
    </dependency>
    <dependency>
        <groupId>org.slf4j</groupId>
        <artifactId>slf4j-log4j12</artifactId>
        <version>1.7.21</version>
    </dependency>
    <dependency>
        <groupId>log4j</groupId>
        <artifactId>log4j</artifactId>
        <version>1.2.17</version>
    </dependency>
</dependencies>
2.在resources中创建shiro.ini和log4j.properties:
[users]
# user 'root' with password 'secret' and the 'admin' role
root = secret, admin
# user 'guest' with the password 'guest' and the 'guest' role
guest = guest, guest
# user 'presidentskroob' with password '12345' ("That's the same combination on
# my luggage!!!" ;)), and role 'president'
presidentskroob = 12345, president
# user 'darkhelmet' with password 'ludicrousspeed' and roles 'darklord' and 'schwartz'
darkhelmet = ludicrousspeed, darklord, schwartz
# user 'lonestarr' with password 'vespa' and roles 'goodguy' and 'schwartz'
lonestarr = vespa, goodguy, schwartz

# -----------------------------------------------------------------------------
# Roles with assigned permissions
#
# Each line conforms to the format defined in the
# org.apache.shiro.realm.text.TextConfigurationRealm#setRoleDefinitions JavaDoc
# -----------------------------------------------------------------------------
[roles]
# 'admin' role has all permissions, indicated by the wildcard '*'
admin = *
# The 'schwartz' role can do anything (*) with any lightsaber:
schwartz = lightsaber:*
# The 'goodguy' role is allowed to 'drive' (action) the winnebago (type) with
# license plate 'eagle5' (instance specific id)
goodguy = winnebago:drive:eagle5log4j.rootLogger=INFO, stdout
log4j.appender.stdout=org.apache.log4j.ConsoleAppender
log4j.appender.stdout.layout=org.apache.log4j.PatternLayout
log4j.appender.stdout.layout.ConversionPattern=%d %p [%c] - %m %n
# General Apache libraries
log4j.logger.org.apache=WARN
# Spring
log4j.logger.org.springframework=WARN
# Default Shiro logging
log4j.logger.org.apache.shiro=INFO
# Disable verbose logging
log4j.logger.org.apache.shiro.util.ThreadContext=WARN
log4j.logger.org.apache.shiro.cache.ehcache.EhCache=WARN3.创建quickstart.java
import org.apache.shiro.SecurityUtils;
import org.apache.shiro.authc.*;
import org.apache.shiro.mgt.DefaultSecurityManager;
import org.apache.shiro.realm.text.IniRealm;
import org.apache.shiro.session.Session;
import org.apache.shiro.subject.Subject;
import org.slf4j.Logger;
import org.slf4j.LoggerFactory;

/**
 * @ClassName Quickstart
 * @Description TODO
 * @Author GuoSheng
 * @Date 2021/4/20  17:28
 * @Version 1.0
 **/
public class quickstart {

    private static final transient Logger log = LoggerFactory.getLogger(quickstart.class);


    public static void main(String[] args) {
        DefaultSecurityManager defaultSecurityManager=new DefaultSecurityManager();
        IniRealm iniRealm=new IniRealm("classpath:shiro.ini");
        defaultSecurityManager.setRealm(iniRealm);
        SecurityUtils.setSecurityManager(defaultSecurityManager);

        // get the currently executing user:
        //获取当前用户对象的subject
        Subject currentUser = SecurityUtils.getSubject();
        Session session = currentUser.getSession();
        session.setAttribute("someKey", "aValue");
        String value = (String) session.getAttribute("someKey");
        if (value.equals("aValue")) {
            log.info("Retrieved the correct value! [" + value + "]");
        }

        //判断当前用户是否被认证
        if (!currentUser.isAuthenticated()) {
            //Token:令牌
            UsernamePasswordToken token = new UsernamePasswordToken("lonestarr", "vespa");
            token.setRememberMe(true);  //记住我
            try {
                currentUser.login(token);   //执行登录我操作
            } catch (UnknownAccountException uae) {
                log.info("There is no user with username of " + token.getPrincipal());
            } catch (IncorrectCredentialsException ice) {
                log.info("Password for account " + token.getPrincipal() + " was incorrect!");
            } catch (LockedAccountException lae) {
                log.info("The account for username " + token.getPrincipal() + " is locked.  " +
                        "Please contact your administrator to unlock it.");
            }
            // ... catch more exceptions here (maybe custom ones specific to your application?
            catch (AuthenticationException ae) {
                //unexpected condition?  error?
            }
        }

        //say who they are:
        //print their identifying principal (in this case, a username):
        log.info("User [" + currentUser.getPrincipal() + "] logged in successfully.");

        //test a role:
        if (currentUser.hasRole("schwartz")) {
            log.info("May the Schwartz be with you!");
        } else {
            log.info("Hello, mere mortal.");
        }

        //test a typed permission (not instance-level)
        if (currentUser.isPermitted("lightsaber:wield")) {
            log.info("You may use a lightsaber ring.  Use it wisely.");
        } else {
            log.info("Sorry, lightsaber rings are for schwartz masters only.");
        }

        //a (very powerful) Instance Level permission:
        if (currentUser.isPermitted("winnebago:drive:eagle5")) {
            log.info("You are permitted to 'drive' the winnebago with license plate (id) 'eagle5'.  " +
                    "Here are the keys - have fun!");
        } else {
            log.info("Sorry, you aren't allowed to drive the 'eagle5' winnebago!");
        }

        //all done - log out!
        currentUser.logout();

        System.exit(0);
    }
}
1.通过 SecurityUtils 获取当前执行的用户 Subject
Subject currentUser = SecurityUtils.getSubject();2.通过 当前用户拿到 Session,shiro的session
Session session = currentUser.getSession();3.用 Session 存值取值
session.setAttribute("someKey", "aValue");
        String value = (String) session.getAttribute("someKey");
4.判断用户是否被认证
currentUser.isAuthenticated()5.执行登录操作
currentUser.login(token);6.打印其标识主体
currentUser.getPrincipal()7.注销
currentUser.logout();官网:Apache Shiro | Simple. Java. Security.
springboot整合shiro
主要实现为以下三个部分:
1.添加依赖:
<dependency>
<groupId>com.github.theborakompanioni</groupId>
<artifactId>thymeleaf-extras-shiro</artifactId>
<version>2.0.0</version>
</dependency>
<dependency>
<groupId>org.projectlombok</groupId>
<artifactId>lombok</artifactId>
<version>1.18.24</version>
</dependency>
<dependency>
<groupId>mysql</groupId>
<artifactId>mysql-connector-java</artifactId>
</dependency>
<dependency>
<groupId>log4j</groupId>
<artifactId>log4j</artifactId>
<version>1.2.17</version>
</dependency>
<dependency>
<groupId>com.alibaba</groupId>
<artifactId>druid</artifactId>
<version>1.2.8</version>
</dependency>
<dependency>
<groupId>org.mybatis.spring.boot</groupId>
<artifactId>mybatis-spring-boot-starter</artifactId>
<version>2.2.2</version>
</dependency>
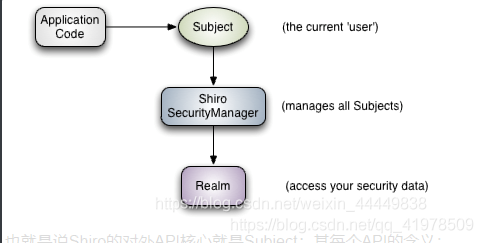
<!--
Subject 用户
SecurityManager 管理所有用户
Realm 连接数据
-->
<!--SpringBoot 和 Shiro 整合包-->
<dependency>
<groupId>org.apache.shiro</groupId>
<artifactId>shiro-spring-boot-web-starter</artifactId>
<version>1.10.0</version>
</dependency>2.在config文件夹中创建两个类:
UserRealm
//自定义realm并且重写方法
public class UserRealm extends AuthorizingRealm {

    @Autowired
    UserMapper userMapper;

    //授权
    @Override
    protected AuthorizationInfo doGetAuthorizationInfo(PrincipalCollection principalCollection) {
        System.out.println("执行了授权");
        SimpleAuthorizationInfo info = new SimpleAuthorizationInfo();
        //拿到当前对象
        Subject subject = SecurityUtils.getSubject();
        //根据下面传值得到user
        User currentUser = (User) subject.getPrincipal();
        info.addStringPermission(currentUser.getPerms());
        return info;
    }
    //认证
    @Override
    protected AuthenticationInfo doGetAuthenticationInfo(AuthenticationToken token) throws AuthenticationException {
        System.out.println("执行了认证");
        //连接真实数据库
        UsernamePasswordToken userToken = (UsernamePasswordToken) token;
        User user = userMapper.queryUserByName(userToken.getUsername());
        if(user==null)  return null;
        //设置session
        Subject currentSubject = SecurityUtils.getSubject();
        Session session = currentSubject.getSession();
        session.setAttribute("loginUser",user);
        //可以加密: MD5
        //密码认证,shiro做,防止泄露,可以加密
        return new SimpleAuthenticationInfo(user,user.getPwd(),"");
    }
}
ShiroConfig
@Configuration
public class ShiroConfig {

    @Bean
    public ShiroFilterFactoryBean shiroFilterFactoryBean(@Qualifier("defaultWebSecurityManager") DefaultWebSecurityManager securityManager){
        ShiroFilterFactoryBean bean = new ShiroFilterFactoryBean();
        //设置安全管理器
        bean.setSecurityManager(securityManager);
        //添加shiro的内置过滤器
        /*
            anon:无需认证就可以访问
            antuc:只有认证才能访问
            perms:拥有某个资源权限才可访问
            role:拥有某个角色权限才可访问
         */
        Map<String, String> filterMap =new LinkedHashMap<String,String>();
        //权限授权
        filterMap.put("/user/add","perms[user:add]");
        filterMap.put("/user/update","perms[user:update]");

//        filterMap.put("/user/add","anon");
        filterMap.put("/user/*","authc");
        bean.setFilterChainDefinitionMap(filterMap);
        //设置登录页
        bean.setLoginUrl("/toLogin");
        //未授权页面
        bean.setUnauthorizedUrl("/noauth");
        return bean;
    }

    //2:创建管理用户需要用到
    @Bean
    public DefaultWebSecurityManager defaultWebSecurityManager(@Qualifier("userRealm") UserRealm userRealm){
        DefaultWebSecurityManager securityManager = new DefaultWebSecurityManager();
        securityManager.setRealm(userRealm);

        return securityManager;

    }

    //创建 realm对象,自定义类
    @Bean(name = "userRealm")
    public UserRealm userRealm(){
        return new UserRealm();
    }

    //整合shiroDialect:用来整合shiro thymeleaf
    @Bean
    public ShiroDialect getShiroDialect(){
        return new ShiroDialect();
    }

}
Thymeleaf
导入命名空间:
xmlns:sec="http://www.thymeleaf.org/thymeleaf-extras-springsecurity5"前端代码:
<p th:text="${msg}"></p>
<hr>
<div shiro:notAuthenticated>
    <a th:href="@{/toLogin}">登录</a>
</div>
<div shiro:hasPermission="user:add">
    <a th:href="@{/user/add}">add</a>
</div>

<div shiro:hasPermission="user:update">
<a th:href="@{/user/update}">update</a>
</div>
集成markdown
参考文章:
(99条消息) SpringBoot整合MarkDown(一步一步实现,详细篇)_K_kzj_K的博客-CSDN博客_markdown springboot